Home
Fundamentals
Research Data Management
FAIR Data Principles
Metadata
Ontologies
Data Sharing
Data Publications
Data Management Plan
Version Control & Git
Public Data Repositories
Persistent Identifiers
Electronic Lab Notebooks (ELN)
DataPLANT Implementations
Annotated Research Context
User Journey
ARC specification
ARC Commander
QuickStart
QuickStart (Experts)
Swate
QuickStart
Walk-through
Best Practices For Data Annotation
DataHUB
DataPLAN
Ontology Service Landscape
ARC Commander Manual
Setup
Git Installation
ARC Commander Installation
Windows
MacOS
Linux
ARC Commander DataHUB Access
Before we start
Central Functions
Initialize
Clone
Connect
Synchronize
Configure
Branch
ISA Metadata Functions
ISA Metadata
Investigation
Study
Assay
Update
Export
ARCitect Manual
Installation - Windows
Installation - macOS
Installation - Linux
QuickStart
QuickStart - Videos
ARCmanager Manual
What is the ARCmanager?
How to use the ARCmanager
Swate Manual
Swate Installation
Excel Browser
Excel Desktop
Windows – installer
Windows – manually
macOS – manually
Organization-wide
Core Features
Annotation tables
Building blocks
Building Block Types
Adding a Building Block
Using Units with Building Blocks
Filling cells with ontology terms
Advanced Term Search
Templates
File Picker
Expert Features
Contribute Templates
ISA-JSON
DataHUB Manual
Overview
User Settings
Generate a Personal Access Token (PAT)
Projects Panel
ARC Panel
Forks
Working with files
ARC Settings
ARC Wiki
Groups Panel
Create a new user group
Data publications
Passing Continuous Quality Control
Submitting ARCs with ARChigator
Track publication status
Use your DOIs
Guides
ARC User Journey
Create your ARC
ARC Commander QuickStart
ARC Commander QuickStart (Experts)
ARCitect QuickStart
Annotate Data in your ARC
Annotation Principles
ISA File Types
Best Practices For Data Annotation
Swate QuickStart
Swate Walk-through
Share your ARC
Register at the DataHUB
DataPLANT account
Invite collaborators to your ARC
Sharing ARCs via the DataHUB
Work with your ARC
Using ARCs with Galaxy
Computational Workflows
CWL Introduction
CWL runner installation
CWL Examples
CWL Metadata
Recommended ARC practices
Syncing recommendation
Keep files from syncing to the DataHUB
Working with large data files
Adding external data to the ARC
ARCs in Enabling Platforms
Publication to ARC
Troubleshooting
Git Troubleshooting
Contribute
Swate Templates
Knowledge Base
Teaching Materials
Events 2023
Nov: CEPLAS PhD Module
Oct: CSCS CEPLAS Start Your ARC
Sept: MibiNet CEPLAS Start Your ARC
July: RPTU Summer School on RDM
July: Data Steward Circle
May: CEPLAS Start Your ARC Series
Start Your ARC Series - Videos
Events 2024
CEPLAS ARC Trainings – Spring 2024
MibiNet CEPLAS DataPLANT Tool-Workshops
Frequently Asked Questions
last updated at 2023-11-02
Install ARCitect via installer
- Head to the ARCitect's GitHub release page.
- Download the macOS installer ARCitect-x.x.x.dmg
- Double-click the installer ARCitect-x.x.x.dmg and move the app to your Applications folder.
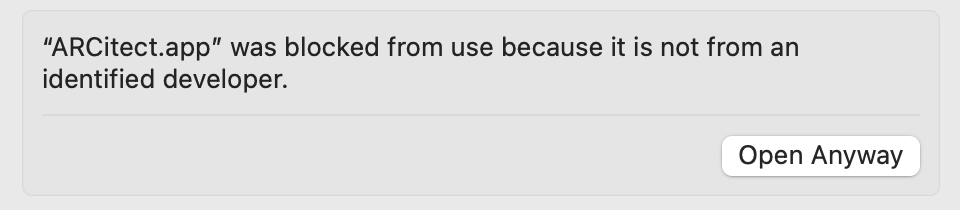
Starting the ARCitect for the first time
When starting the ARCitect for the first time, you are warned about an unidentified developer
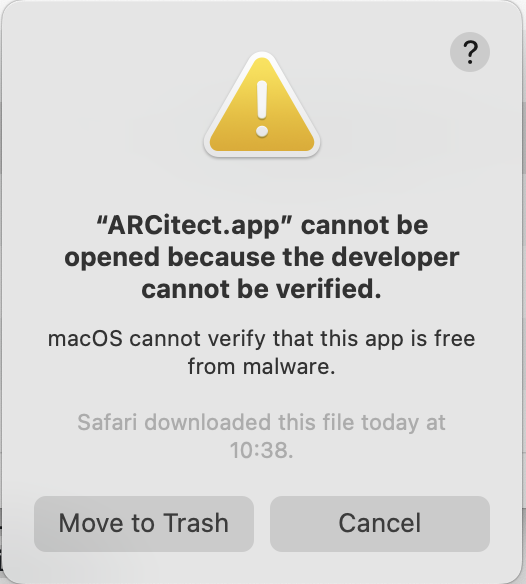
Please navigate to the Privacy & Security panel in your System Settings to "Open Anyway".
 Incoming network connections
Every time you start the ARCitect, you are asked to allow
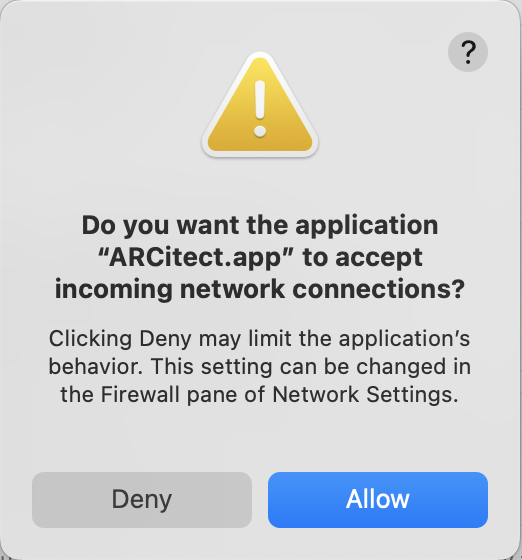
This enables communication with the DataHUB.
Alternative installation from source
💡 If the installation via installer does not work or the app seems buggy, please
install ARCitect from source
Installation from source requires Git, Git LFS and Node.js
Install Git and Git LFS
Please install Git and Git LFS before using the ARCitect.
💡 For macOS we recommend to install via homebrew as described on the site above.
Install Node.js
Please install the latest version of Node.js.
- Download the installer for your operating system (e.g. macOS Installer)
- Once downloaded, open the
node-x.x.x.pkg from your downloads folder and follow the "Install Node.js" instructions.
Install ARCitect
Head to the ARCitect's GitHub release page.
Under "Assets" download the latest source code archive (Source code (zip)).
In Finder, open the folder where you downloaded the ARCitect
Unzip the folder (ARCitect-x.x.x.zip). You can move this folder to another location (e.g. Applications).
Open the folder in a terminal (right click → services → New Terminal at Folder)

- In the terminal, check that node.js is installed by executing
node -v
💡 This should display your installed version of node.js, e.g.
v18.17.0
- In the terminal, execute the following command to install the ARCitect
npm install
💡 This may take some seconds to minutes depending on your internet connection.
Start the ARCitect
- In the terminal, execute the following command to start the ARCitect
npm run debug
or
npm start
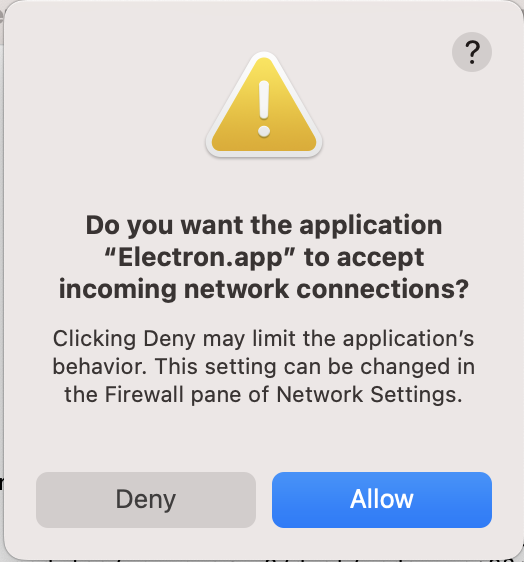
💡 A window will pop-up asking whether you want to accept incoming network connections. This needs to be allowed for communication with the DataHUB.
You can leave the terminal running in the background. Once you close the terminal, the ARCitect quits.
Switch to the ARCitect app.
💡 You might have to select the app from your dock.